
How to Use the Piano Roll in Ableton: Complete Guide
- bumpydogz
- Nov 14, 2021
- 7 min read

The Ableton Piano Roll is one the most important tools to master in your DAW. It will become the focal point of your creative process from where you'll construct epic chord progressions, thumping basslines, and awesome sounding melodic hooks!
In this tutorial I'll be taking a deep dive into how to use Ableton Live's Piano Roll. Starting with the very basics we'll explore some great Piano Roll techniques and shortcuts to help you take your music productions to the next level.
Let's get started...
Table of Contents
What is a Piano Roll?
The Piano Roll displays MIDI data along a timeline, allowing you to easily arrange and edit MIDI information such as note pitch, length, and velocity. It is used to create chord progressions, melodies, and harmonies, as well as to construct drum patterns.
The vertical axis is shown as a visual representation of a piano keyboard, whilst the horizontal axis shows time divided into beats and bars.

How to Open the Piano Roll
To open the Piano Roll in Ableton, firstly ensure that you have a MIDI track in your project. If you don't then create a new MIDI clip by selecting Insert MIDI Track from the Create menu at the top of Live's user interface or use the shortcut [CMD + Shift + T] on a Mac or [CNTRL + Shift + T] on a Windows PC.
If you are in Session View, open the Piano Roll by double-clicking a MIDI clip slot. Alternatively, you can bring up the Piano Roll by right-clicking on an empty MIDI clip slot and selecting Insert MIDI Clip(s).

If you are in the Arrangement View, open the Piano Roll by clicking and dragging an area of the MIDI track to select the length of your clip. Then right-click and select Insert MIDI Clip(s).
Now that we've opened the Piano Roll, let's go through some basic controls.
How to Resize the Piano Roll
To adjust the size of the Ableton Piano Roll, move your mouse cursor slightly above the Piano Roll until the icon changes from a pointer to the Resize icon. You are then able to left click and drag the window up or down to resize it.

How to Zoom on the Piano Roll
To Zoom within the vertical axis on the Ableton Piano Roll, move your mouse cursor to the left of the piano keys until the icon changes from a pointer to a magnifying glass. You are then able to left click and drag either to the left or right to zoom in/out on the Piano Roll along the vertical axis.

To Zoom within the horizontal axis on the Ableton Piano Roll, move your mouse cursor to the top of the window until the icon changes from a pointer to a magnifying glass. You are then able to left click and drag either to the left or right to zoom in/out on the Piano Roll along the horizontal axis.

How to Adjust the Grid
To adjust the grid size, simply right click anywhere within the Piano Roll and choose from the various Adaptive or Fixed Grid options. Each option will affect the number of beat subdivisions that will be displayed within the grid.

How to Add MIDI
MIDI notes can be added into the Ableton Piano Roll in several different ways:
By manually adding notes into to a MIDI clip
By dragging in an existing MIDI file from a project folder
By converting an Audio Track into MIDI
By recording MIDI from a controller or MIDI keyboard
In this article I'm going to concentrate on manually adding notes into the Piano Roll as I've already covered the other options in this article.
Adding MIDI into the Piano Roll is as straight-forward as double clicking on the Piano Roll. This will create a note that is automatically snapped to the grid.
When you play the clip though you may not hear anything. Why is that?
Why Can't I Hear MIDI?
MIDI data itself does not produce any sound. It is simply a set of instructions that enable a physical or virtual instrument to reproduce a musical composition. In order to hear any audio, you therefore need to insert an instrument onto the MIDI track.
To do this go to the Instruments tab in Live's browser and drag the instrument of your choice onto the MIDI track, or select a VST plugin from the Plug-Ins tab.
If you're new to Ableton, understanding the distinction between audio and MIDI tracks can be confusing. If you want an easy to understand explanation on the differences between audio and MIDI then check out this article: MIDI vs Audio - What's the difference?
To hear MIDI whilst you're editing the Piano Roll, make sure you have enabled the MIDI Editor Preview option. To do this select the blue headphones icon within the Piano Roll.
How to Quantize MIDI
Quantizing in Ableton allows you to snap your MIDI to the Piano Roll grid to ensure that your notes are exactly in-time. It is usually done to correct timing issues within a captured live performance.
Having perfectly quantized notes however is not always desirable, as having small imperfections within your music allows it to sound more human and less robotic. Because of this Ableton allows you to adjust the amount of quantization you can apply to your notes.
To open the Quantize Settings Menu within Ableton, simply right click within the Piano Roll and select Quantize Settings from the menu. Alternatively, you can use the shortcut [CMD + Shift + U] on a Mac, or [CNTRL + Shift + U] on a Windows PC.

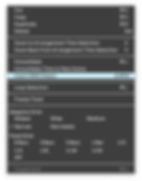
Within the Quantize Settings you are able to change what beat sub division you want to quantize to, whether to adjust the start and/or end of the note, as well as the amount of quantization you want applied:

Quantizing your MIDI is now as simple as selecting which notes you want to quantize within the Piano Roll, before right-clicking with your mouse and selecting the Quantize option from the menu:

How to Edit Velocity
In MIDI, a note's velocity corresponds to how hard that it is pressed. This means that a note with a higher velocity generally sound louder than one with a lower velocity. The range of MIDI velocities run from 0 through to a maximum of 127.
In Ableton, both the MIDI Velocity Editor and Chance Editor lanes (described below) can be displayed or hidden by clicking the lane selector toggle buttons located at the bottom-left of the Piano Roll. The velocity editor lane is displayed by default.

Individual note velocities can be adjusted by moving the corresponding velocity adjustment sliders. A note with a high velocity will also appear brighter within the Piano Roll than one with a lower velocity.
You can add randomisation to your note velocities by adding a non-zero value within the Randomize control located to the left of the Piano Roll.
It's also possible to add velocity randomisation within a specific range. To add a velocity range, select your MIDI note(s) and adjust the value within the Velocity Range control located at the bottom-left of the Piano Roll. This will set the amount by which Live will randomise the velocities above and below their current values.
The difference between setting Randomize and adjusting the Velocity Range, is that Randomize will give you a fixed new random velocity, whereas setting a Velocity Range will give you new random velocities each time the clip is played.

How to Use the Ableton Chance Feature
The Ableton Chance feature was introduced in Ableton Live 11. It allows you to control the probability of a MIDI note triggering from a zero change right through to a 100% probability.
To use this feature, you first need to toggle the Chance Editor Lane display toggle as it is not displayed by default. From there you can adjust the individual probabilities by using the sliders.

The Ableton Chance Feature allows for some really creative ways to make music. Check out the video below for a great tutorial on using Chance in Ableton Live 11:
How to Use the Ableton Fold Feature
The Fold button in Ableton allows you to filter out notes that you are not currently using. It can be a handy tool when creating short melodies and sequences, as it simplifies the Piano Roll display to allow you to focus in on only those notes you are interested in.
To activate the fold feature, toggle the Fold button located at the top-left of the Piano Roll:

How to Use the Ableton Scale Feature
One of the great features that was introduced in Ableton Live 11 is the MIDI Scale Function. This useful tool allows you to filter out all notes that are not harmonically related to each other, by only showing notes within a specified scale on the Piano Roll.
To use the Ableton scale feature simply activate the Scale button at the bottom left of the clip editor. You can then select your key and pick from 35 different scales. Once your scale is chosen, every note within that scale will be highlighted within the Piano Roll, with special emphasis being given to the tonic note.

To show only the notes within your chosen scale, click the Scale button within the Piano Roll itself. This acts in a similar fashion to the Fold button in that it hides every note that isn't within the scale.
Check out the video below if you want to know more about the Ableton Scale function:
Final Thoughts
I hope you found this post helpful.
If you're new to Ableton and find tutorials like this helpful, or just want to be notified of free plugins and deals, then make sure you subscribe using the link below.
Have a great day.